Vercel is an excellent service to host and deploy your front-end application to. There are a lot of great features such as GitHub integration, monorepo support giving you the option to select a subdirectory to deploy, support for multiple bundling packages, e.g. Parcel, Next.js, Vite, Angular etc. and multiple environments. However, with the latter, it initially seems that it’s only possible to have two environments, Preview and Production (and Development for local dev).
This isn’t entirely true as I will show you in this blog, and I’ll show you how to do it with GitHub Actions (although it isn’t 100% required to use Actions and you can instead use the Vercel CLI if you wish)
Setup
In this guide, we will be using Minsu Lee’s (amondnet) GitHub Action for Vercel deployments (see: amondnet/vercel-action). You can create a GitHub Actions workflow using this action as the main step in the workflow. Workflows go in your GitHub repository in the root directory .github/workflows/{insert-deploy-workflow-name}.yaml
Here’s an example from the readme:
name: Deploy Application
on: [pull_request]
jobs:
  deploy:
    runs-on: ubuntu-latest
    steps:
      - uses: actions/checkout@v2
      - uses: amondnet/vercel-action@v20 #deploy
        with:
          vercel-token: ${{ secrets.VERCEL_TOKEN }} # Required
          github-token: ${{ secrets.GITHUB_TOKEN }} #Optional
          vercel-args: '--prod' #This is what will enable us to have separation of environments
          vercel-org-id: ${{ secrets.ORG_ID}}  #Required
          vercel-project-id: ${{ secrets.PROJECT_ID}} #Required
          working-directory: ./frontend-app-directory #If you are in a monorepo where you have backend code and frontend code, you can use this to only deploy your frontend code in the sub directory
          alias-domains: ${{ vars.DOMAIN }} #Domain name for your deployment
For the tokens and IDs, you will have to set up an account and project on Vercel and you should be able to find the details in the settings of the project and organisation. If I remember correctly, the vercel-org-id will be known as the “Team ID” in the organisation settings.
You will put these secrets in GitHub Actions secrets which can be found in your repository settings tab, then find “Secrets and Variables > Actions” in the sidebar.
You can find out more details on how to set up by reading the documentation, but what I will focus on is the ability to simulate multiple environments.
Choose environments using Actions inputs
on:
    workflow_dispatch:
        inputs: # GitHub Actions inputs will allow you to select environments
            releaseType:
                description: 'Release Type'
                required: true
                default: 'test'
                type: choice
                options:
                    - test
                    - staging
                    - prod
You can use “inputs” in your GitHub Actions workflow and refer to it in your action to determine which environment to deploy to. Replace the on: property in the previous example with the above. You can then refer to it using ${{ inputs.releaseType }} and use it in conditionals for environment specific configurations. E.g. vercel-args: ${{ inputs.releaseType == ‘prod’ && ‘--prod’ || ‘’ }}
Alternatively, you could have one workflow for each environment.
Deploying to a chosen environment
Environment variables (environment-specific)
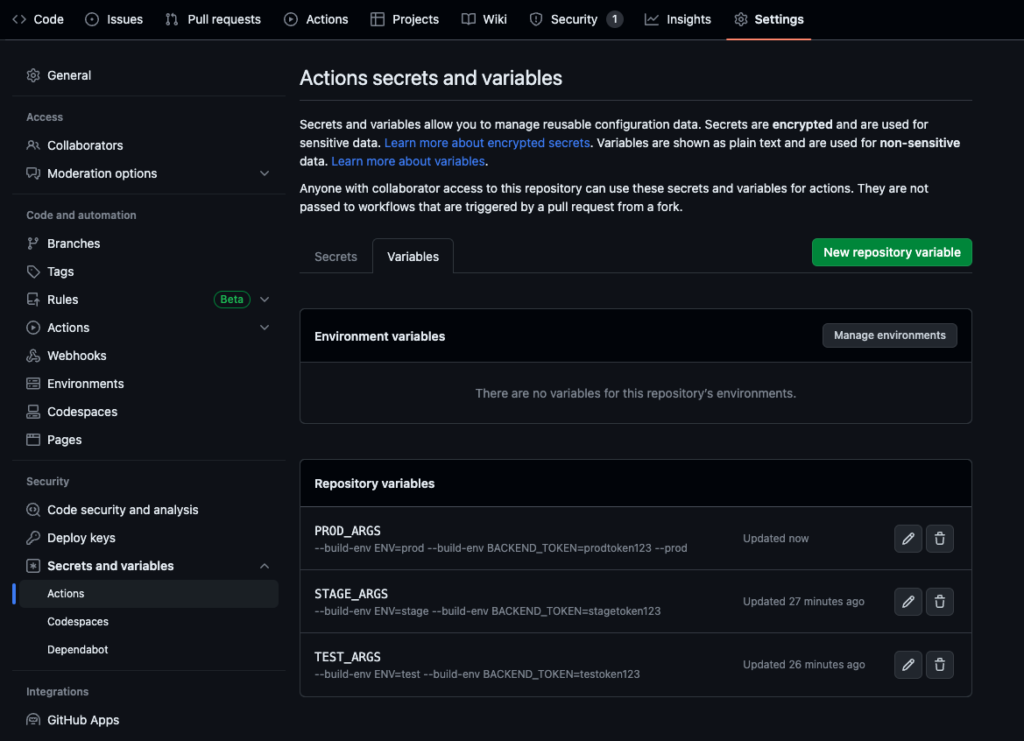
To separate environments, we will first create variables for the GitHub Actions. See the example below:

You can click the green “New repository variable” button to create a variable. As you can see in the screenshot I’ve already created some which will be passed into vercel-args property in the GitHub action mentioned earlier. vercel-args will be the arguments that are used by the action to insert when running the vercel deployment. We can leverage this vercel-args attribute of the action to pass in environment-specific environment variables, each variable will be passed in as using the --build-env option and then {VARNAME}={value} so --build-env {VARNAME}={value}. And you can have as many of these options as you want.
To deploy to production, make sure to also add in the --prod option to the arguments.
An example would be:
vercel-args: ${{ inputs.releaseType == 'prod' && vars.PROD_ARGS || inputs.releaseType == 'staging' && vars.STAGE_ARGS || inputs.releaseType == 'test' && vars.TEST_ARGS || '' }}This will ensure that the selected environment will get its own environment variables.
Environment-specific domains
We will use a similar strategy for environment-specific domains. Ensure that you have set up the CNAME in your DNS provider to point each domain you would like to cname.vercel-dns.com.
So for example, in your Domain Name, let’s say, company.com, you can add a CNAME record for test.company.com by going into the DNS records for company.com and adding a CNAME record
To pass in the domain, we will use the alias-domains property of the GitHub Action. You can put the domain name as a hardcoded string in the workflow, or alternatively create a repository variable (which is recommended as you can change it easily).
alias-domains: ${{ inputs.releaseType == 'prod' && 'app.company.com' || inputs.releaseType == 'staging' && 'app.stage.company.com' || inputs.releaseType == 'test' && 'app.test.company.com' || '' }}Or with GitHub variables:
alias-domains: ${{ inputs.releaseType == 'prod' && vars.PROD_DOMAIN || inputs.releaseType == 'staging' && vars.STAGE_DOMAIN || inputs.releaseType == 'test' && vars.TEST_DOMAIN || '' }}Complete example
Here’s a complete example, combining all the parts for a workflow:
name: Deploy Application
on:
    workflow_dispatch:
        inputs: # GitHub Actions inputs will allow you to select environments
            releaseType:
                description: 'Release Type'
                required: true
                default: 'test'
                type: choice
                options:
                    - test
                    - staging
                    - prod
    pull_request: #This is to automatically deploy on a pull request
        branches:
            - main
        paths:
            - 'frontend-app/**'
    push: #This is to automatically deploy on a push to main
        branches:
            - main
        paths:
            - 'frontend-app/**'
jobs:
  deploy:
    runs-on: ubuntu-latest
    steps:
      - uses: actions/checkout@v2
      - uses: amondnet/vercel-action@v20 #deploy
        with:
          vercel-token: ${{ secrets.VERCEL_TOKEN }} #Required
          github-token: ${{ secrets.GITHUB_TOKEN }} #Optional
          vercel-args: ${{ inputs.releaseType == 'prod' && vars.PROD_ARGS || inputs.releaseType == 'staging' && vars.STAGE_ARGS || inputs.releaseType == 'test' && vars.TEST_ARGS || '' }} #Environment Specific Arguments
          vercel-org-id: ${{ secrets.ORG_ID }}  #Required
          vercel-project-id: ${{ secrets.PROJECT_ID }} #Required
          working-directory: ./frontend-app
          alias-domains: ${{ inputs.releaseType == 'prod' && vars.PROD_DOMAIN || inputs.releaseType == 'staging' && vars.STAGE_DOMAIN || inputs.releaseType == 'test' && vars.TEST_DOMAIN || '' }} #Environment Specific Alias Domain
See bolded code for the main blocks that make the multiple environment deployments work.

Recent Comments